Create datasource in the AIV
In this document you will learn the concept of Data source, you will create a new data source.
In this exercise you will also learn to create datasets from how to connect to different kind of data sources as well as used data source to create different data sets.
👇 Create Datasource in AIV.
Create datasource: From Create Datasource tutorial you will learn to create datasource in AIV.
👇 Create Datasource and connect with MySQL database.
Connect datasource MySQL: From this MySQL Datasource tutorial you will learn to connect datasource with MySQL datasource in AIV.
👇 Create Datasource and connect with PostgreSQL database.
Connect datasource PostgreSQL: From this PostgreSQL Datasource tutorial you will learn to connect datasource with PostgreSQL datasource in AIV.
👇 Create Datasource and connect with Google BigQuery.
Connect datasource BigQuery: From this BigQuery Datasource tutorial you will learn to connect datasource with BigQuery datasource in AIV.
In order to create the datasource follow these steps:-
There are two ways in which a user can create a datasource in the AIV application.
By clicking on the create icon
 on the bottom most toolbar.
By right clicking on any existing datasource as follows:-
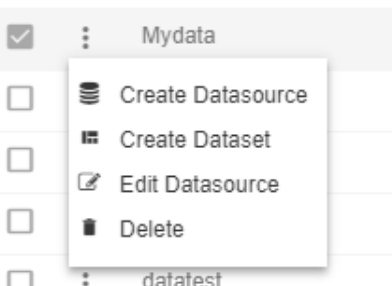
Click on the Create Datasource using any of the methods above which will open the dialog box as shown below:-
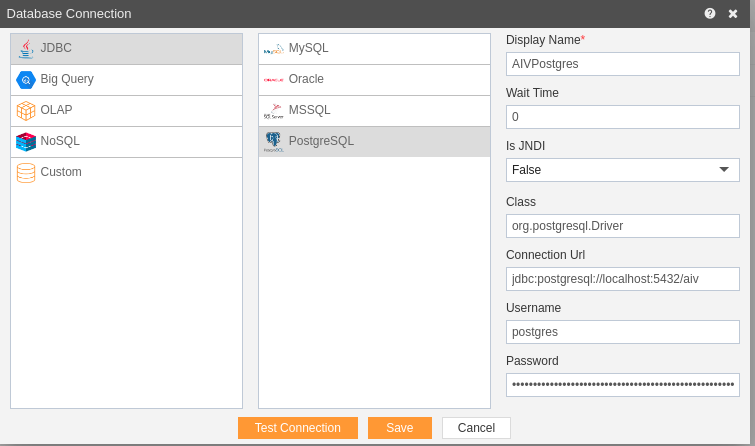
Here, we are creating a datasource named AIVPostgres Data which will store data related to the AIV and hence the display name.
5. Wiat Time:-
It is amount of time the user (the code requesting a connection) will wait before getting a connection timeout. To improve performance set Max Wait Time to zero. This essentially blocks the usrr thread until a connection becomes available & allows the server to alleviate the task of tracking the elapsed wait time for each request and increases performance.
For this example; Keep Wait TIme is 0.
6. JNDI:-
JNDI is the acronym for the Java Naming and Directory Interface API. By making calls to this API, applications locate resources and other program objects. A resource is a program object that provides connections to systems, such as database servers and messaging systems.
For this example; keep JNDI it False.
- As we are connecting JDBC with PostgreSQL org.postgresql.Driver driver is used to connect.
8. Driver:-
- A JDBC driver uses the JDBC™ (Java Database Connectivity) API developed by Sun Microsystems, now part of Oracle, that provides a standard way to access data using the Java™ programming language. Using JDBC, an application can access a variety of databases and run on any platform with a Java Virtual Machine. Using JDBC allows you to write one application that can send SQL statements to different data sources. SQL is the standard language for accessing relational databases.
9. Connection URL:-
A database connection URL is a string that your DBMS JDBC driver uses to connect to a database & provides a way of identifying a database so that the appropriate driver recognizes it and connects to it. It can contain information such as where to search for the database, the name of the database to connect to, and configuration properties.
For this example; connection url is jdbc:postgresql://localhost:5432/aiv
9. Password & Username:-
A password is used by the system to connect to its database.
A Username is unique identifier used to gain access to a computer, network, or a system.
For this example; The Username is root and password is password to connect to theyar server.
After that test connection, if it is successful click on save else click cancel button.
While saving the database, you will be given an option to create a dataset as well.

Accept if you want to create a DataSet right now or decline for later.
You have successfully created a datasource in the AIV application.
In case of any further help, the user can click on the
 icon to access the AIV help documents.
If the user is not satisfied and wants to cancel the create request, he can do this by clicking on the cancel button next to save or by clicking on
 button next to the icon.
In this manner, you can create a datasource in the AIV application.